

Bleaching Wood Furniture: DIY Guide


Let’s talk wood bleach! One of my favorite furniture looks is a raw, unstained wood look. You’ve gone through all that work of removing the existing finish, but you don’t love the natural color of the wood. This happens to me all of the time! It’s too yellow, has pink undertones, or maybe it’s just a bit dark. Bleaching wood furniture is a great way to lighten it up before sealing it. This article covers when to think about bleaching, how to do it, and options for finishing and sealing your bleached surfaces.
When to bleach wood furniture
The most obvious time to bleach wood furniture is when you want the wood to be lighter. When you sand a piece down to raw wood, you may love the color of just the way it is! But it is important to remember that sealing the peice (even with a clear topcoat) will change the color. Water-based topcoats will darken the wood slightly, and oil-based topcoats will yellow or amber over time.
Bleaching the wood is also a great way to pull out some of the color in the wood. If it has yellow or pink undertones, bleaching can remove some of that color. Even if I am considering staining a piece, I will often still bleach to remove some of these undertones in the wood so they don’t show through in the final stain.
Finally, bleaching wood furniture can get rid of stains, discolorations, and hardware “ghosting” (where the wood is lighter underneath the old hardware. If you are changing the existing hardware and want to have a wood finish, this is an issue you’ll have to address.
A note on product links
This post contains Amazon affiliate links, meaning I get a small commission on qualifying purchases, at no cost to you.
Methods for bleaching furniture
There are many products and methods out there for bleaching furniture, and it can be overwhelming to know what to use. And as is often the case in furniture refinishing, there isn’t one that is best for all cases. It depends on what you are trying to do! If you want to lighten up the wood itself, using Zinsser wood bleach or household bleach works best. If you want to remove stains and even out the overall tone, but not significantly change the color of the wood, use oxalic acid. More specifics on each method can be found below.
Safety First!
For all methods, be sure to wear gloves, safety glasses, and a respirator. And follow all of the manufacturer’s instructions for use and cleanup.
1. Zinsser wood bleach
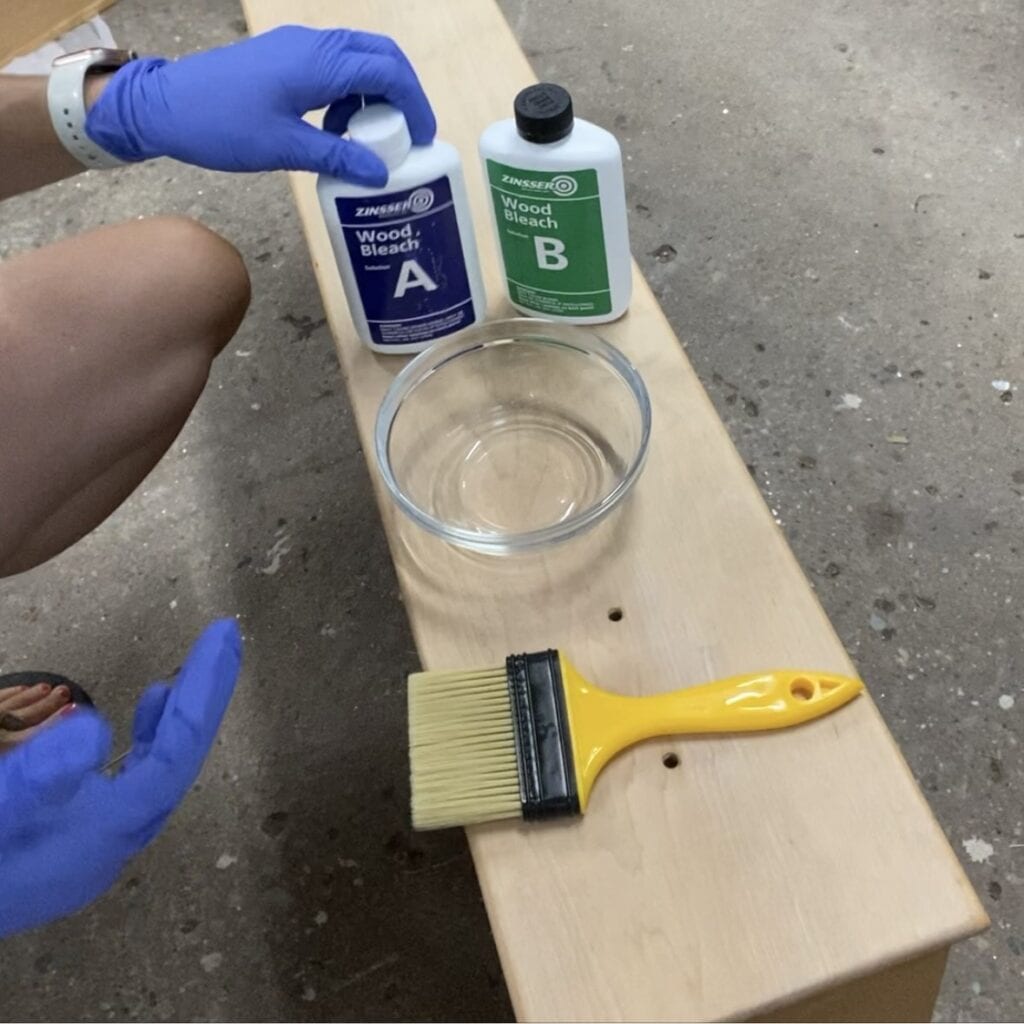
Using Zinsser wood bleach is my preferred way to bleach wood furniture – I find it is the most effective. It is a two-part kit that can be found on Amazon and other big-box and hardware stores.
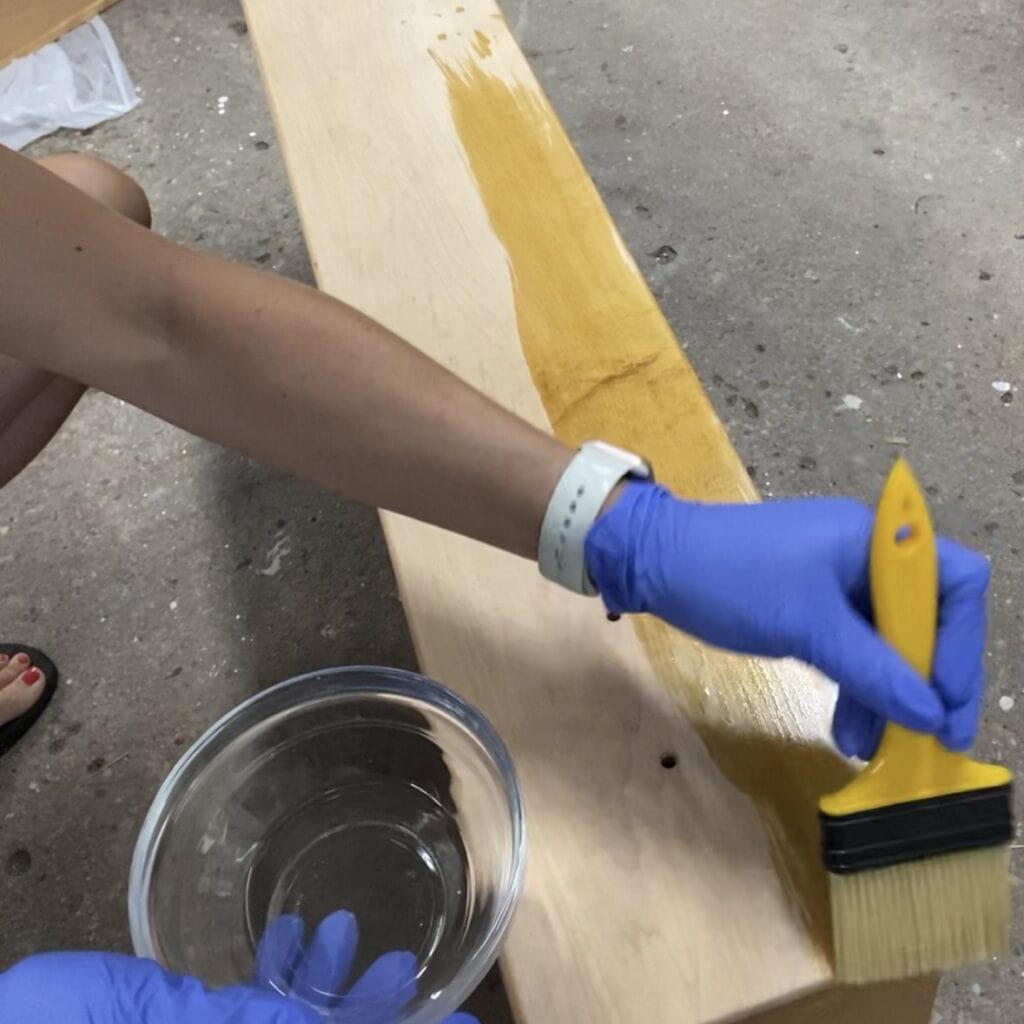
- Step 1: Pour Part A into a glass or ceramic bowl and apply evenly with a chip brush or sponge to the raw wood surface. Let Part A sit for 5-10 minutes (5 for softwoods and 10 for hardwoods), but don’t let it dry out.
- Step 2: Pour Part B into a separate glass or ceramic bowl and apply it evenly over the damp surface where Part A has been sitting. Use a new chip brush or sponge for this step. Let it dry for at least 4 hours.
- Step 3: Repeat steps 1-3 if you are looking for a lighter finish.
- Step 4: Once you have the desired shade and the wood is completely dry, neutralize with a 50/50 water and vinegar solution and let dry.
- Step 5: Sand the surface evenly with 220 grit. You want the surface smooth, but also don’t want to oversand and remove too much of the lightened wood. The wood beneath the surface will be the original darker wood.
Be sure that you protect your workspace with a drop cloth if necessary (I’m working on a concrete floor, so I don’t care about stains or messes). Protect your skin with gloves and wear protective glasses. Work in a well-ventilated area.
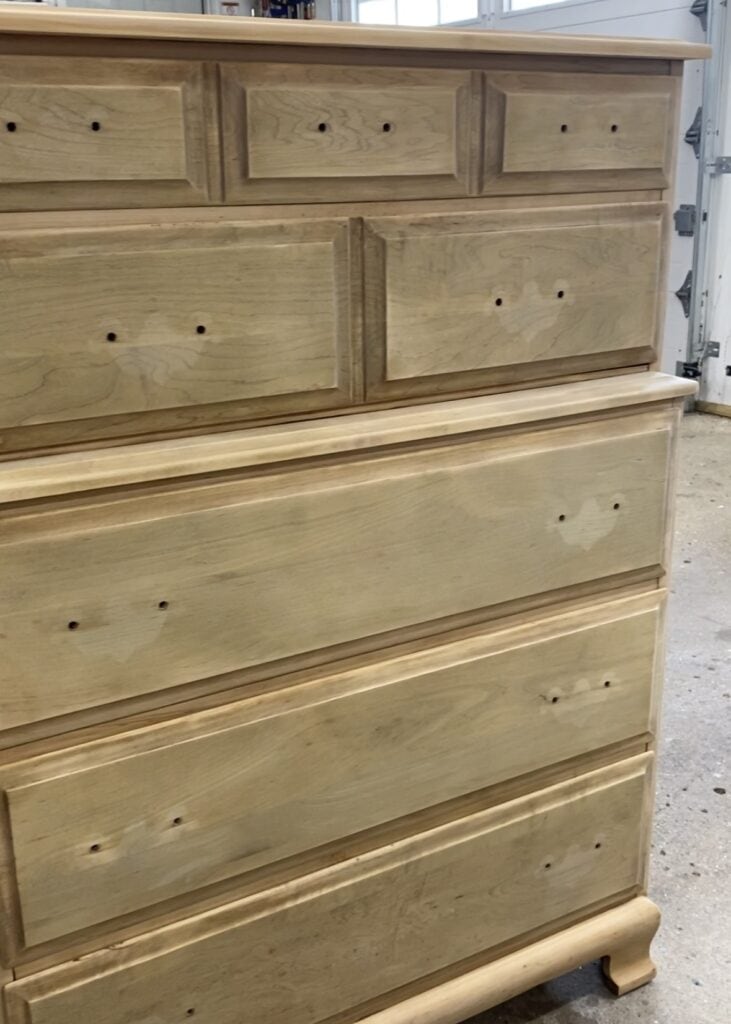

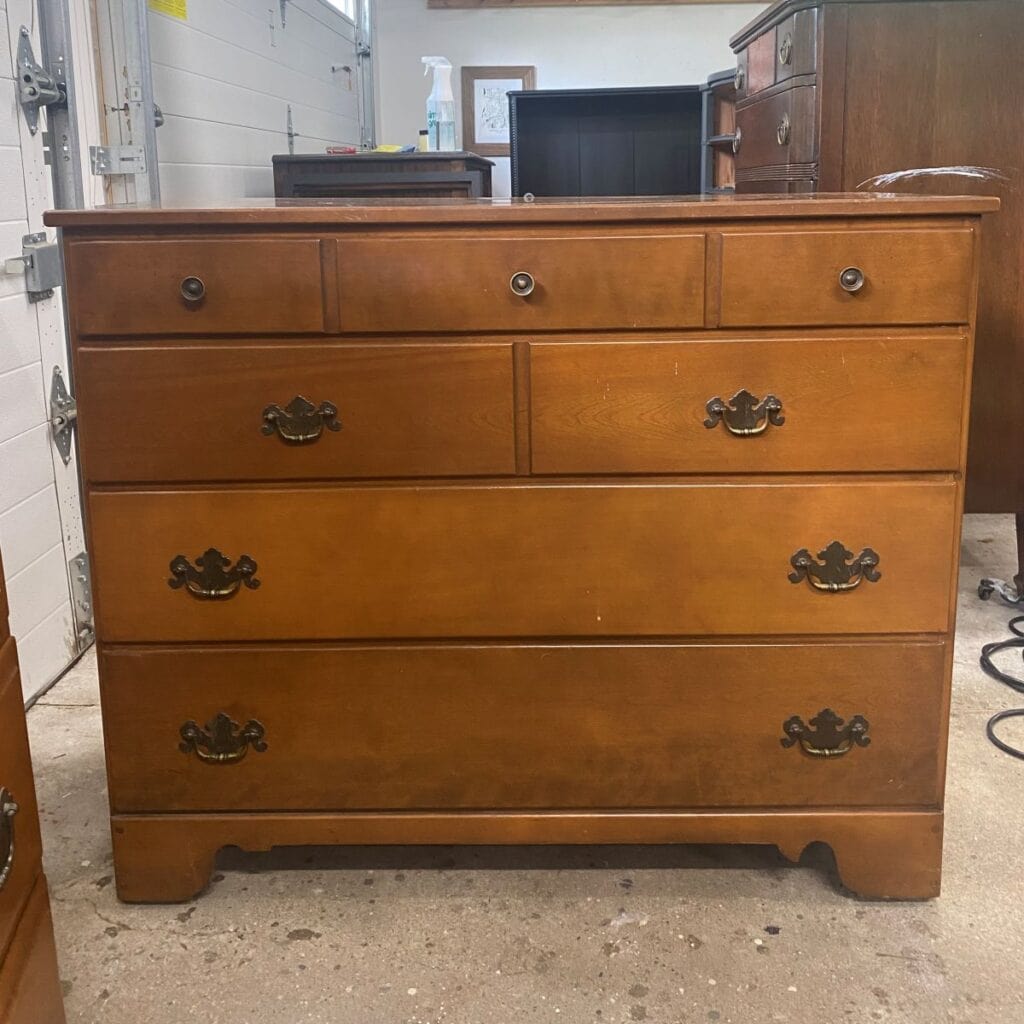
These photos above show a dresser before and after 2 rounds of Zinsser Wood Bleach. You’ll also notice how the bleach removes the “ghost” hardware marks from the raw wood.
2. Traditional household bleach
While using the Zinsser kit is my preferred way to bleach, there are times when I don’t have any on hand and don’t want to hold up my project waiting for it to be delivered. Yes, I can be impatient! In these cases, the second wood bleaching method that I’ve tried is just using plain old household bleach. This works best if you aren’t looking for a big change. It is definitely a more subtle approach, but it does work.
- Step 1: Pour household bleach into a glass bowl (don’t use plastic or metal), and using a chip brush, evenly coat the surface. Do this in a well-ventilated area.
- Step 2: Let dry for several hours and repeat as necessary. I find it generally takes 3 to 4 rounds of bleaching. If possible, dry in direct sunlight; this helps with the bleaching process.
- Step 3: When you are happy with the final tone, neutralize the wood by wiping it with a 50/50 mix of white vinegar and water. Let dry completely.
- Step 5: Sand the surface evenly with 220 grit. You want the surface smooth, but also don’t want to oversand and remove too much of the lightened wood. The wood beneath the surface will be the original darker wood.
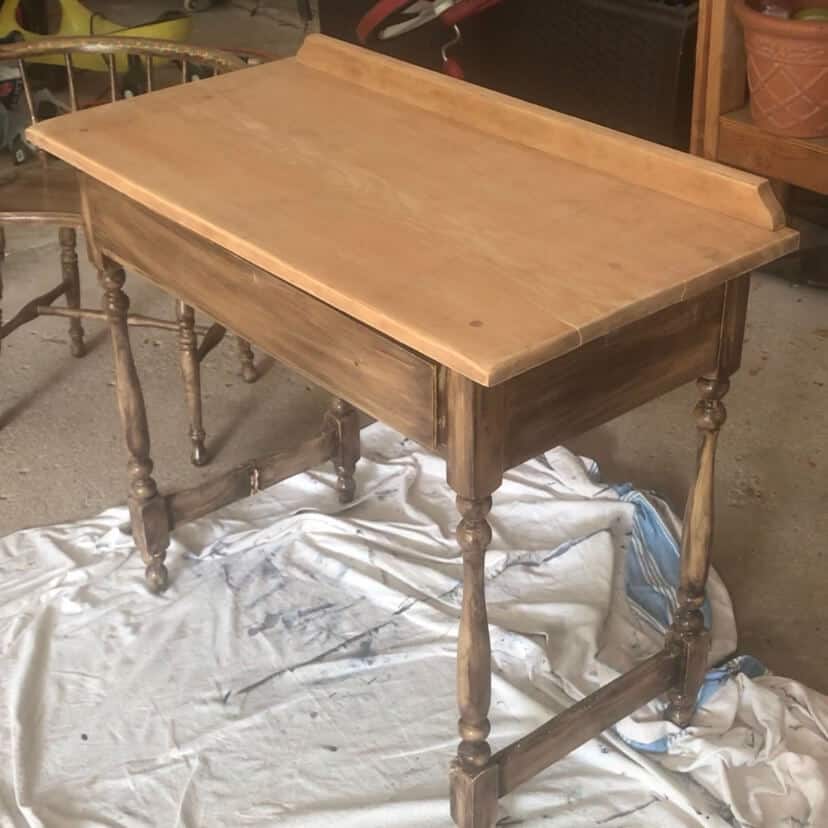
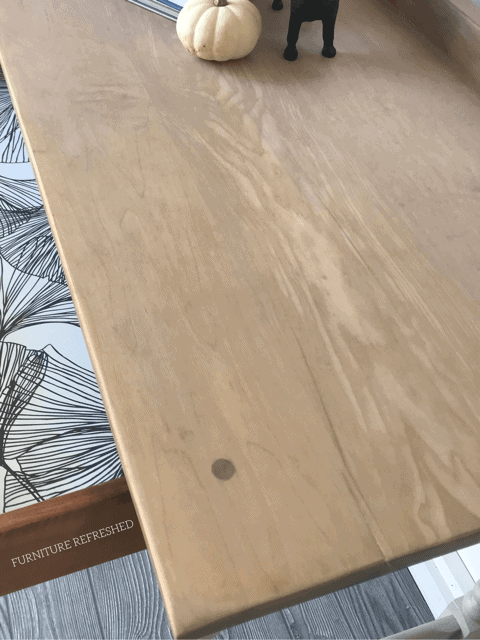
The photos above show a raw wood desk top before and after using household bleach. The wood was light to begin with, but the bleach definitely helped to remove some of the pink undertones.
Would you like to save this?
3. Oxalic acid
If you search for wood bleach, chances are oxalic acid products will come up in your results. Oxalic acid is great for removing stains from wood. You may see a slight lightening of the wood overall, but it’s not as significant as using Zinsser’s two-part bleach or even household bleach and some sunshine. But if you just want to even out discolorations, water rings, and stains in your raw wood, it’s a great option.
- Step 1: Mix the powder into hot water. Follow the ratio instructions for the product that you are using.
- Step 2: Use a chip brush to apply over the area you want to fix. While you can use it as a spot treatment, I find you’ll have better results if you apply it to the entire surface you are working on (such as the top of a dresser).
- Step 3: Scrub into the wood with a scrub brush or Scotch-Brite pad. Let dry. Repeat if necessary.
- Step 4: Rinse several times with water to ensure the product has been removed. If there is any white residue remaining once dry, there is still residual product that needs to be rinsed off.
- Step 5: Sand the surface evenly with 220 grit. You want the surface smooth, but also don’t want to oversand and remove too much of the lightened wood. The wood beneath the surface will be the original darker wood.
Finishing and sealing the bleached wood
Once you have completed the bleaching process and sanded your wood smooth, it is time to apply additional finishes and seal the wood. There are several different finishes, which I’ve outlined below:
1. Seal with a water-based sealer
This is the quickest option as the sealer is the final step. I use a water-based sealer, such as General Finishes High Performance Topcoat or Polyvine Wax Finish Varnish, becuase they won’t yellow over time. A traditional oil-based polyurethane will. The water-based topcoat will cause the wood to darken slightly, but you can test the final tone of the water-based sealer on the wood by wetting the raw wood. I have a post that talks more about applying a water-based topcoat to furniture (it is focused on painted projects, but the same methods can be used over wood).
2. Paint wash and seal
Sometimes, there may still be some blotchiness or unevenness in the wood tones on a piece of furniture after bleaching. Or, you test the raw wood color, and it is still a little darker than you like. In these cases, I would do a paint wash, picking the color in the final tone that you are looking for. More details about paint-washing furniture can be found here.
3. Stain and seal
Finally, you may want to go with a more traditional stained finish. In this case, I prefer to use an oil-based stain and an oil-based polyurethane. Becuase of this, I will wait an extra day before proceeding (you don’t want any water moisture in the wood to react with the oil-based product). More information on staining can be found in this article which covers stripping and staining.
Summary
Bleaching wood furniture is a great way to take a vintage piece with a dated finish and give it a fresh new look. It’s a great alternative to paint if you have the patience to remove all of the existing finish. Remember that the color you start with and the type of wood you have will impact your results. If you give it a try, I’d love to know your experience!
Other articles you might like:
- How to Paint Wash Furniture
- Stripping and Staining Furniture
- How to Seal Painted Furniture: Protecting With a Topcoat
As always, please let me know if you have any questions. Want to learn more about all things furniture? Make sure to sign up for my newsletter to get the latest updates and exclusive content.